Tuesday, June 30, 2015

Thai Sweet Sticky Rice with Mango


Sweet shiny and translucent sticky rice with ripe mangoes


My son, daughter and I just love this Thai dessert. It is a must have when we dine at any Thai restaurants. My husband likes it too but he he tries to avoid it since this is a carb rich recipe. For me I just care about the taste and texture. I simply love it.

Ingredients

1 cup Thai glutinous or sticky rice, soaked for at least 2 hours or overnight
1 cup coconut milk (I used Aroy-D coconut milk)
1/2 cup sugar
1/2 teaspoon salt
2-3 pandan or screwpine leaves (optional)

freshly peeled and sliced ripe mangoes

for the coconut cream topping

1/2 cup coconut milk
1/8 teaspoon salt
1/2 teaspoon sugar
1 teaspoon corn starch mixed with 1 tablespoon of water

toasted sesame seeds or toasted mung beans (instructions below)

Directions

1.  Prepare a steamer and let the water come to a rolling boil. Line the steamer with a cheese 
     cloth.
2. Drain the glutinous rice and place the rice on the cheese cloth and steam the rice for 
     about 2o minutes.
3.  In the mean time prepare the coconut sauce for the sticky rice. Take a pot and add 
      coconut milk, sugar, salt and pandan leaves and heat on low heat until the sugar has 
     dissolved.  Remove the pot from the stove and remove the pandan leaves. Keep it aside.   
     Don't let the coconut milk come to a boil.
4.  Next prepare the coconut cream topping. In another pot add all ingredients and mix     
      well.  Place the pot on the stove on low heat and stir the coconut cream until the cream 
      thickens. Remove from the stove and keep it aside.
5.  When the rice is cooked, remove the rice and place it in a shallow bowl.  Pour half of the 
      coconut sauce on the rice and stir well. Keep adding more coconut sauce, one spoon at a 
      time until the coconut milk just covers the surface of the rice. Stir well and leave it for 
      about 15-30 minutes for the rice to absorb the coconut sauce.
6.  When the sweet sticky rice has absorbed all the coconut sauce, serve the sweet sticky rice 
      with freshly sliced ripe mangoes.  Drizzle some coconut cream on top of the rice and 
      sprinkle with some toasted sesame seeds or toasted mung beans before serving. 

To make toasted sesame seeds or toasted mung beans

To make toasted sesame seeds, take some sesame seeds and roast it in a pan on low heat until the seeds turn light brown.

To make toasted mung beans, take about 1/2 cup of hulled mung beans, wash and soak in some water for about an hour or until it has plumped a little and the color of the beans turn pale. Drain the beans and place the beans on some kitchen towel and air dry the beans for about 15-30 minutes. Next pan roast the beans on low heat until the beans turn slightly brown.

If the sticky rice is too wet

If you have added too much coconut sauce and find the sticky rice is too wet, all is not lost. Just put the wet sticky rice back on steamer and steam the rice for about 15-20 minutes. The rice will get a bit softer but it is still delicious.  


Monday, June 29, 2015

Coconut Crepes or Kuih Dadar


This is another nonya or malay tea-time or breakfast snack. It is also called Kuih Ketayap. This is actually a crepe or pancake that is filled with sweet coconut filling or inti kelapa and rolled. There is no coloring added to my kuih ketayap and the vibrant green color is from the pandan leaves or screwpine leaves.  Even my youngest who is such a picky eater enjoyed this snack that I made for tea today.


my crepe maker

crepe maker pan 


 pandan batter in the crepe maker pan


pandan batter cooking on crepe making 

Ingredients

for the batter

1 cup All Purpose Flour, sifted
4-6 Pandan Leaves, washed and cut into small pieces
2 cups water
1 large egg
1/4 tsp kosher salt


Oil for greasing the crepe pan or non stick pan

Directions

1. Put all the ingredients into a blender and blend the ingredients for a few minutes until 
    everything is finely blended. I used my Vitamix to blend the ingredients. Use a strainer           and strain the pandan crepe batter into a bowl.
2. Leave the batter aside for at least 20 minutes.
3. Use a non-stick pan or crepe pan and lightly grease it. Pour a ladle of batter into the non 
     stick pan and swirl the pan to make an even crepe. I used an electric crepe maker. I 
     poured the batter into the pan that came with the crepe maker and immersed the hot         
     crepe maker into the batter.
4. Remove the cooked crepe from the pan or crepe maker and leave it to cool. Repeat with 
     the rest of the batter.
5. Take a tablespoon of coconut filling or inti kelapa and put in the center of crepe. Roll the 
     crepe like how you would roll a spring roll.  
6. Serve with some hot tea or coffee.


Sunday, June 28, 2015

Vanilla Cinnamon French Toast


I had some about half a loaf of bread and it seemed like the kids were not too interested in eating bread for their breakfast. So instead of waiting for the bread to get moldy and throw them out, I decided  to make french toast for breakfast for the kids, the way my mom used to make them when I was little. The only difference in my version is that I added some vanilla extract and cinnamon.  The french toast disappeared in a couple of minutes.

Ingredients

10-12 slices of bread, sliced diagonally
1 cup of milk
1/4 cup of sugar
1/4 cup of condensed milk
1/4 teaspoon kosher salt
2 large eggs
1 teaspoon vanilla extract
1/2 teaspoon cinnamon powder

butter for greasing the skillet

Directions

1.  Heat a skillet on medium low heat.
2.  In a bowl add all the ingredients except the bread and butter.
3.  When the skillet is hot, add some butter and smear the butter all around the skillet.
4.  Dip some about 3-4 slices of bread in the egg mixture and fry the bread on the skillet 
      about 3-4 minutes on each side or until the sides have browned nicely. Remember to 
      keep the flame of medium low or low since the egg mixture is sweet and can burn easily.
5.  Remove from french toasts from the skillet and dust with some icing sugar.
6.  Repeat with the rest of the bread slices.


Saturday, June 27, 2015

Deep Fried Fruit Loops Ice-Cream - My Daughter's Creation


I was again impressed with my daughter's creation of this Fruit Loops Deep Fried Ice Cream. I think this was a real genius idea. Because the flavor of the crunchy deep fried fruit loops and vanilla ice-cream felt like a pairing made in heaven. The fruit loops complements the vanilla ice-cream so well.   Her deep fried ice cream was so perfect. The skin was so crunchy but the ice cream was still hard. It was just so perfect and since she is a newbie to cooking, I can't express how impressed I am with her skills and ingenuity. Well done my Girl. I am so proud of you. 

Recipe, courtesy of my daughter

Ingredients

2 scoops of Vanilla Ice-Cream or any ice cream flavor
1 egg white
1/4 teaspoon of Vanilla extract
1 cup of Fruit Loops cereal
1-2 cups of Cooking oil for deep frying

Directions

1. Take one scoop of the vanilla ice cream and place it on a cling wrap. Cover the ice cream 
    with the cling wrap and gently roll it into ball. Immediately place the ice cream in the 
    freezer to freeze. Repeat with the other scoop of ice cream. Freeze the ice cream for at least     4 hours.
3. After 4 hours or when the ice cream has hardened, put the egg white in a bowl and add 
    the vanilla extract. Beat the egg white with a fork.
2. In another bowl add the fruit loop cereal and crush it lightly. 
3. Remove the ice cream from the freezer and roll in the egg white and then roll it on the 
    crushed fruit loop cereal.  Return the coated ice cream into the freezer and leave it to 
    freeze overnight.
4. When  you are ready to serve the deep fried ice creams, heat the cooking oil on high in a     
     small pot.  Make sure that oil is deep enough to cover the ice cream balls. 
5. When the oil is smoking hot take one ice cream ball and gently lower it into the hot oil. 
    Fry for the ice cream for a few second until the coating is slight brown and feels hard. This 
    will only take a few seconds.
6. Quickly remove the ice cream to a plate lined with paper towel. Immediately serve the ice 
    cream on a dessert place and dust some icing sugar on it. 
7.  Repeat steps 5 & 6 for the other ice cream ball. Double up the recipe to make more ice 
     cream balls.

My Son's Cool Retainers


Cute case to go with the retainers.  The orthodontics team let him decorate his retainer case.


My son's teeth wally crooked and we decided to start his orthodontic treatment when he started his 9th grade in high school. It looks like the kids here start there orthodontic treat somewhere in elementary and middle school and by the time they are in high school, they all have perfect teeth at least at the school that my son goes to.  We started his treatment in September 2013, to be exact it was 7 September 2013. I just saw his photos from his file when he had to go for his X-rays, etc. He looked like a baby and he is so grown up now.  His braces came off yesterday and he went for a total dental check and clean up and his teeth look good now and does he :). He also got this cool set of retainers that he has to wear 24 X 7 for the next six months. I don't think he has any complaints about this.  I just hope he doesn't lose his retainers because they cost so much. My daughter had her orthodontics treatment in completed in Malaysia before moving here and she only had to wear her retainers at night.  So during on of our holidays we went to New York and my daughter placed her retainers in the paper coffee cup. I saw it and I told her to put her retainers in her case or the hotel room service staff might accidentally throw that cup away. She told me not to worry and she will take good care of it and low and behold what happened the next day, well needless to say more. After w got back from our holidays, I took her immediately to my son's orthodontist and ordered a new pair of retainer for her. She had to wait around 2 weeks to get her replacement set and during that period one of her front teeth had moved, so while her teeth still look good it is not as how it had been after her orthodontic treatment. If only they could listen....

Wednesday, June 24, 2015

Daun Kunyit or Turmeric Leaves


Beautiful turmeric leaves in my backyard. I planted some turmeric roots about a year ago and now the turmeric leaves are finally coming out. .

Turmeric leaves or daun kunyit is a quintessential ingredient in Chicken Rendang, a Malaysian dish. Since moving here I have not made chicken rendang since I could not find the turmeric leaves at my local Asian stores. So I decided to planted the turmeric roots to get the leaves. I guess it's time to make Nasi Lemak with Rendang Tok. I just have to wait for a few more days for the leaves to mature a little so that the aroma of the turmeric leaves will be stronger.

Tuesday, June 23, 2015

Malaysian Roti Canai or Kerala Parotta


I think they are the same although I am used to the Malaysian roti canai of course, being a Malaysian.  Roti canai with teh tarik used to be our usual breakfast eat-out every weekend. Sometimes we even have it for dinner. This bread is usually very soft and at the same time crispy on the outside. It goes so well with dhall and sambal ikan bilis. Roti canai is one oily bread. I usually dab a tissue on my bread to removed the excess oil. I never realised how much oil is used in this bread until I started making my own. Although I have to use oil to create the layers in the roti canai or parotta, it was far from being oily like the ones served at restaurants in Malaysia. So if my family is going to have roti canai it is definitely going to be home made. 


Well rested and a relaxed roti canai dough. 


Flatten dough

Dough stretched into a thin film. See how you can see my fingers through the stretched dough


Stretched dough being pleated from one end to the other end 


 Dough twisted into a round


Twisted dough


Twisted dough being rested for another 5-10 minutes
  

 Flattened out ready and ready to hit the skillet


Cooking on the skillet


Well cooked and crispy roti canai


Flaky and crispy roti canai after a couple of hits to reveal the layers and flakiness

Ingredients


4 cups all purpose flour or even bread flour, sifted

1 teaspoon salt
1/4 cup condensed milk
1/4 cup granulated sugar
1 1/2 cups water

cooking oil


Directions


1.  Fit a cake mixer with a dough hook. Add the sifted flour, salt, sugar and condensed milk 

     into the mixing bowl. Set the mixer to low and let the mixture combine for about a 
     minute.
2.  Gradually add the water to make a soft dough.  Let the mixer knead the dough for about 
     15-20 minutes.  
3.  After kneading the dough for about 15 minutes or so cover the mixing bowl and keep in a 
     cool place for the dough to rest.  It is advisable to rest the dough for at least 4 hours. 
4.  After the dough has rested, remove the dough from the bowl and shape the dough into 8-
     10 balls.
5.  On a clean counter top, pour about a tablespoon of cooking oil and place one ball of    
     dough on the oil. Using the palm of your hand flatten the dough and stretch it out until it 
     forms a thin film.
6.  At this stage, take a bit more cooking oil and smear the oil all over the thin dough 
     and pleat the thin dough lengthwise from one end to the other and twist into a  round.  
7.  Repeat this step for the rest of the dough balls and let the twisted round doughs rest for 
     another 5- 10 minutes.
6.  Hold the long dough and start swirling it in circles. Tuck the end of the dough into the 
      bottom of the parotta or roti canai dough.
6.  Repeat for the rest of the dough balls.
7.   Heat a lightly greased skillet on medium heat. Take one twisted roti canai dough and 
      flatten it gently to make a flat bread.  Cook the roti canai on both sides until both sides 
      are well cooked and nicely browned.
8.  Removed the roti canai and using your hand quickly hit the sides of the bread together in 
      a clapping motion to release the layers in the bread and to show its flakiness.
9.   Serve hot with dhall, sambal or curry.


Sunday, June 21, 2015

Homemade Noodles


Ingredients

1 lb high protein flour or bread flour (about 4 cups of flour)
1 tablespoon kosher salt
1 cup water ( I nuked some carrots and pureed them with 1 cup of water and then measured out 1 cup of carrot puree)

Directions

1.  Put the flour and salt into a mixing bowl. 
2. With a mixer attached with a dough hook set the mixer on low and stir the flour and salt 
     for a few seconds.
3.  Gradually add in the water or carrot puree and let the mixer knead the flour into a dry 
     dough. This should take less than 5 minutes.
4.  Remove the mixing bowl from the mixer cover it and leave the dough to rest for 30 
     minutes.
5.  After 30 minutes, put the mixing bowl back in the mixer and knead the dough for     
     another 5 minutes.
6.  Repeat steps 4 & 5 for another 2 rounds. 
7.  Remove the dough from the mixing bowl and cover it up a cling wrap.
8.  When you are ready to make the noodles, boil a big pot of water on the stove. 
9.  Take some dough, dust with some flour and roll 
      it up to about 1/4" thickness or to the thickness that you like. Fold the dough and cut in 
      out into thin strips. I used a pasta maker to roll out the dough and to cut the dough into 
      strips.
10. Prepare a bowl of cold water filled with ice. Take a portion of the noodles and drop it into        the boiling water. After about a minute or when the noodles are half cooked, remove the 
       noodles and immerse the noodles into the iced cold water. Drain the noodles and put 
       into a storage container. Repeat with the rest of the noodles. 
11.  Take a tablespoon of cooking oil and rub it all over the cooked noodles to prevent it from 
       sticking together.
12.  The noodles can be kept in the fridge for about 3 days or can keep longer if kept in the 
       freezer.
13. These noodles are very delicious. It is firm and chewy and it is a good way to add 
       vegetables into your kids diet. You can also make it with pureed spinach instead of 
       carrots.  I served my noodles with vegetable curry.

Home Made Candied Lemon and Orange Peel


Candied Orange Peels


When my brother and his family were visiting us, my sis-in-law When my brother When my brother and and his family were visiting us, my sis-in-law mentioned that she just loved sugee fruit cake. I decided to make some sugee/semolina fruit cake for her but I did not have any fruit mixes and I couldn't find any at the store. So I googled up some recipes to see what proportions of dried fruits I should use. That part came easy but I also had to get some candied lemon and orange peel. Again I googled up some recipes and made my own candied lemon and orange peel for the cake. It is best to keep the candied peel for a few days before adding it to the cake.


Ingredients

100g of lemon peel, cut into small cubes
100g of orange peel, cut into small cubes
1 cup of sugar
1/2 cup of water
1 tsp of lemon juice.

Directions

Boil sugar, water and lemon juice until sugar syrup is quite thick or reduced to 1/3. Add in the cubed orange and lemon peel and boil syrup for a further 2-3 minutes. Cool and refrigerate.
Bottled Candied Peels

Sri Lankan Semolina Christmas Fruit Cake

Nutty Fruity Semolina Fruit Cake
Fruit Cake - cut up for storing

In December 2013, my brother visited us with his wife and daughter. This was our first Christmas here and we felt so honored to have him and his family celebrate the holidays with us. While chatting with my sis in law, she mentioned that one of her Sri Lankan aunties from UK had made a delicious Semolina Fruit cake. I was so tempted to try it so I googled up some recipes and came out with my own version. I think the Sri Lankan fruit cake has cardamom powder added to the cake. I did not add cardamom in my fruit cake simply because I don't like cardamom flavored cakes. My sis in law said that it was very good and quite similar to the one her aunt made. I was quite pleased with my effort.


Ingredients

for the fruit marinade:
250g raisins
125g blackcurrants
125 candied orange & lemon peel
125g  red cherries
125g green cherries
1 cup chopped or halved cashew nuts
1 tbsp rose essence
1 tbsp vanilla essence
1/4 tsp almond essence
1/2 cup brandy or rum (I used rum)

Put all the ingredients above in a zip lock bag. Shake it well and leave it t marinate in the fridge for at least a day. I left mine in the fridge for a few days. Actually I left it in the fridge until it was Christmas day and I forced myself to bake the Christmas cake. Well....my so called lazy mood... ;)

for the Cake
2 1/2 + 1/2 sticks of salted butter (113g per stick)
240g  dark brown sugar
2 tbsp of golden syrup
220g of semolina
80g of all purpose flour + 1 tsp of mixed spice, sifted together
5 large eggs, at room temperature


Directions
1. Roast semolina under medium low heat with 1/2 a stick of butter until you get a nice nutty smell. Refer to picture below. Leave it to cool.
2. Beat butter, sugar and golden syrup until light and fluffy.
3. Add in eggs one at a time, beating well after each addition.
4. Beat in vanilla essence.
5. Mix the cooled roasted semolina with the flour and spice and add it to the butter-egg mixture, alternating flour and the marinated fruits and nuts.
6. Line a 9 x 9" cake tin with four layers of grease proof paper.
7. Pour cake batter into 9 x 9 " into cake tin and bake in a preheated oven at 300 F for about 21/2 to 3 hours or until a skewer inserted inside the cake comes out clean.
8. Once cake is done immediately remove cake from the oven and drizzle with 2 tablespoons of rum.
9. Cool well before refrigerating. Cut the cake when it is cold otherwise cake will be crumbly.
10. Cake tastes better after a few days. Enjoy :))

Semolina roasted with butter

Steamed Fruit Cake

During my last summer vacation in Malaysia, my lovely sis-in law bought this steamed fruit cake from a friend who brought this cake all the way from JB. The cake was simply superlicious.  Steamed fruit cakes are one of the must haves during festive seasons in Malaysia. When I came back after my vacation, I pulled out this recipe that  I had in my recipe files and tried it out. It turned out simply wonderful and delicious and really moist. I steamed it for 4 hours but the cake is done in 2 hours actually. Steaming it for 4 hours helps to keep improve the cake's shelf life. But with a cake like this, it's probably gone in a day or two. This steamed fruit cake recipe is from Pn Hjh Rahimah's blog. She conducts cooking classes this is the recipe she uses in her class and many of her students have used this recipe to sell steamed fruit cakes. Thank you so much Pn. for sharing this recipe.


Ingredients

250 gm salted butter ( I used Kerry Gold)
300g granulated sugar + another 250gms of sugar for the caramel
6 large eggs
2 tablespoons vanilla essence

sift together
600 gm all purpose flour
2 tablespoons nutmeg powder( I used 1 tablespoon of mixed spice)
2 teaspoons baking powder
teaspoons cream of tartar
teaspoons bicarbonate of soda

600 gms mixed fruits (I could not get the mixed fruits here since it was not in season so I mixed, currants, raisins, orange and lemon peel that I made myself, red and green cherries)

Directions

1. Grease and line a  8" square cake pan. Prepare the steamer and add enough water and bring it to a  boil. Keep the steamer closed.
3. Beat butter with 300gms of granulated sugar until light and fluffly.
4. Add in eggs and beat well after each addition.
5. Add in the vanilla essence and beat well.
6. Turn the mixer speed to low. Mix the flour with the mixed fruits and fold add it the butter mixture a little at a time and mix well.
7. Turn off the mixer. Put a pan or non stick pan on medium heat and add the sugar. Keep a close eye on the sugar otherwise it will burn and the cake will taste bitter. Once the sugar turns golden brown, lower the heat to low and heat the caramel for a few second more to get a nice golden amber color. 
8. Turn off the heat and quickly and carefully pour the hot caramel into the cake mixer with the cake mixer on low speed. Use the cake mixer poring shield for safety since this caramel is really hot. 
9. Once the caramel is combined into the cake batter, pour cake batter into the cake tin and seal the cake tin with foil. Make sure that the tin is well sealed with the foil. 
10. Steam for about 2 hours or until done. Steam the cake for 4 hours if you want the cake to last long. Add boiling water to the steamer occasionally since you dont want the water in the steamer to dry out.
9. Once the cake is done, cool in the pan for about 10 minutes and the remove it to a rack. Cool completely before cutting the cake. Enjoy.

Creamy Coleslaw


Ingredients
1/2 head of green cabbage
1/2 head of purple cabbage
2 carrots, shredded
1/2 cup of chopped red onions
1 tsp celery seeds (optional)
2 tbsp thinly sliced green onions

Mix together:
1 cup mayonnaise
1 tbsp vinegar
1/2 cup of sour cream or greek yogurt
1 tbsp agave nectar or sugar
a dash of French's yellow mustard
pinch of salt
Directions

1. Add the top 6 ingredients into the mayo mixture and toss it well. There is no fixed recipe for this. Everything is just an approximate according to your taste.

Applewood smoked Pulled Chicken

This recipe is another one of my family favorites. Everyone loves it, so do I but I just keep to the cooking and not the eating. I usually make it without the smoked applewood since I don't have a smoker or grill at home, however I decided to try smoking the chicken in the oven after eating applewood smoked pulled pork at Subway.
Boneless chicken breasts marinated with garlic powder, black pepper and lime juice


Dry Mix


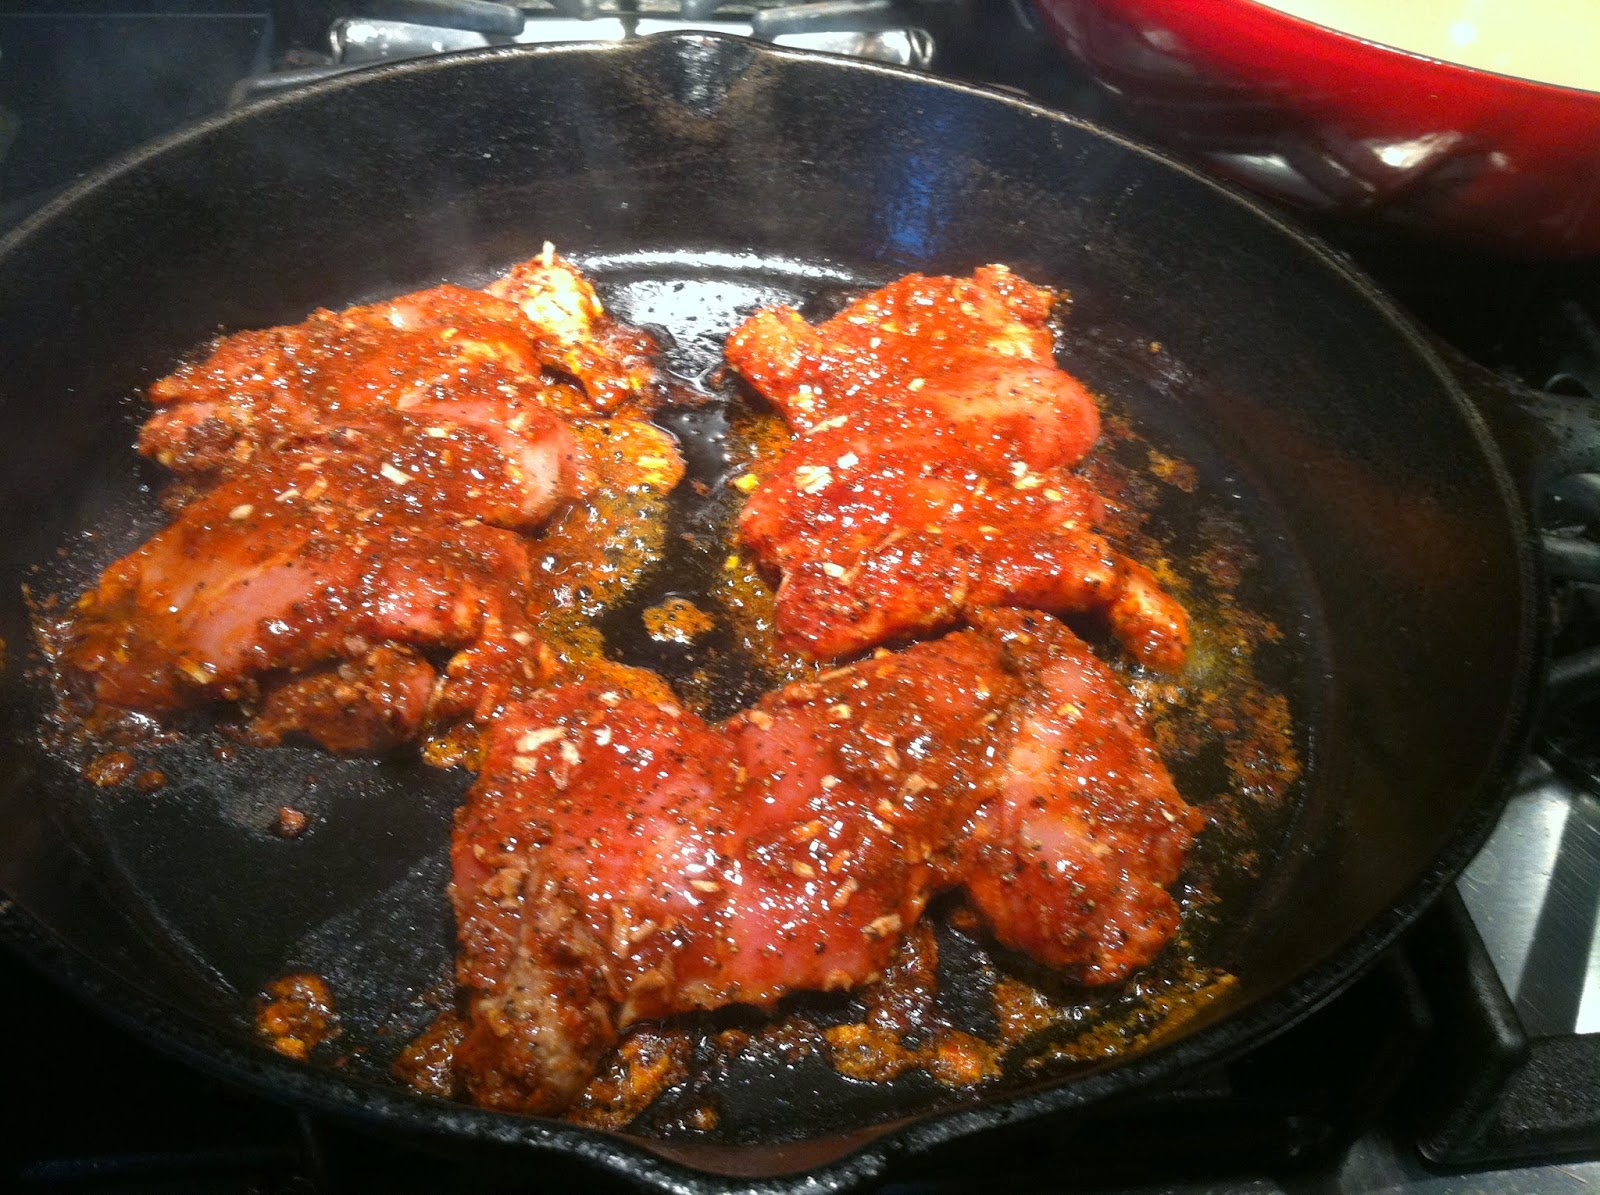
Chicken thighs marinated with the dry rub and onto the smoking skillet for searing
Chicken thighs being seared on the hot skillet


Tomato Sauce and Chipotles in Adobo Sauce
Seared chicken thighs, tomato sauce, mustard, barbeque sauce and chipotles
Damp applewood chips wrapped in foil and ready to go into the oven
After about 2 hours of slow cooking in the oven. I removed the foil with the applewood chips and I started hitting the meat gently with my spatula 
All the chicken thigh meat is pulled out and mixed with its sauces
Ingredients

Marinade for the chicken thighs
3 lbs of boneless chicken thigh, remove excess fat and clean (I used organic free range chicken)
2 tbsps garlic powder
1 tbsp coarsely ground black pepper
juice of 1 lime

for the dry rub (mix everything together)
1 cup of brown sugar
1 tbsp kosher salt
1 tbsp paprika powder
2 tbsp onion granules or onion powder
1 tsp cumin powder

For the sauce:
1/2 cup barbeque sauce
1 tbsp French's yellow mustard
1 454g can of tomato puree
1 tbsp of onion granules
2 tsp chipotle paste (I ground "chipotle peppers in adobo sauce". It comes in a tin and you can find it in the hispanic aisle in at the supermarket)

to smoke
Applewood chips

Some kaiser rolls
Creamy coleslaw

Directions

1. Heat a dry cast iron skillet on high heat until it starts to smoke
2. In the meantime, take the dry rub and rub all over the chicken thighs and arrange them on a plate.
3. When the skillet is smoking, pour 1 tbsp of canola oil and grill the chicken thigh with the dry rub,  a few pieces at a time. Once the bottom part of the chicken i browned, turn it over the brown the other side. We dont have to cook the chicken, but just brown the sides.
4. Once the chicken thighs are browned on both sides, remove them from the skillet and place them in a nice dutch oven or casserole dish. I used my Le Creuset large casserole pan which works great for this dish.
5. Once all the chicken thighs are browned, add the sauce mixture to the browned chicken thigh and give it a good mix.
6. Next take two layers of heavy duty aluminium foil over a clean plate and place some damp applewood chips(spray some water over the chips) on it and wrap the foil tightly. Poke some small holes on the top of the foil and place it on top of the chicken. I used this method to get the applewood smoke into my chicken.
7. Place it an oven and set the temperarure to 250F. Cook the chicken for about 2 hours or until the meat is very tender.
8. Once the chicken is done, take it of the oven and remove the applewood wrapped foil.
9. Remove the chicken thighs and hit the chicken thigh gently with a silicone spatula  or pull it with your fingers to separate the meat. This should be pretty easy if the meat is very well cooked
10. Put the pulled chicken back into its sauce and taste for salt and sugar. Add more barbeque sauce if needed.
11. Serve on a toasted kaiser roll topped with some creamy coleslaw and enjoy.